
# 通用API
| 变量 | 作用 | 调用 |
|---|---|---|
| beginPath | 重开一个路径 | beginPath() |
| closePath | 将画笔以直线回到此次路径的起点 | closePath() |
| stroke | 将本次beginPath以后的线都描出来 | stroke(path2D) |
| fill | 将本次beginPath以后的线都填充出来 | fill(path2D?, fillRule?) |
| clip | 剪裁掉之前的路径以外的区域(可以通过restore恢复) | ctx.clip(path?, fillRule?) |
| clearRect | 清除方块 | clearRect(x, y, width, height) |
# path2D
path2D是固定一套路径,随时可以复用
<canvas id="canvas" width="200" height="200" style="width:200px; height: 200px;"></canvas>
<script>
    const canvas = document.querySelector("#canvas");
    const ctx = canvas.getContext("2d");

    // path2D固定路径
    const path2D = new Path2D();
    path2D.arc(100, 100, 70, 0, Math.PI * 2);
    path2D.moveTo(200, 0);
    path2D.bezierCurveTo(100, 0, 80, 70, 170, 90);

    ctx.fillStyle = "red";
    ctx.strokeStyle = "blue";
    ctx.stroke(path2D); // 不同的方法使用path2D操作会有不同的效果

    //
    ctx.fillStyle = "black";
    ctx.rect(0, 0, 50, 100);
    ctx.fill();
</script>
1
2
3
4
5
6
7
8
9
10
11
12
13
14
15
16
17
18
19
20
2
3
4
5
6
7
8
9
10
11
12
13
14
15
16
17
18
19
20
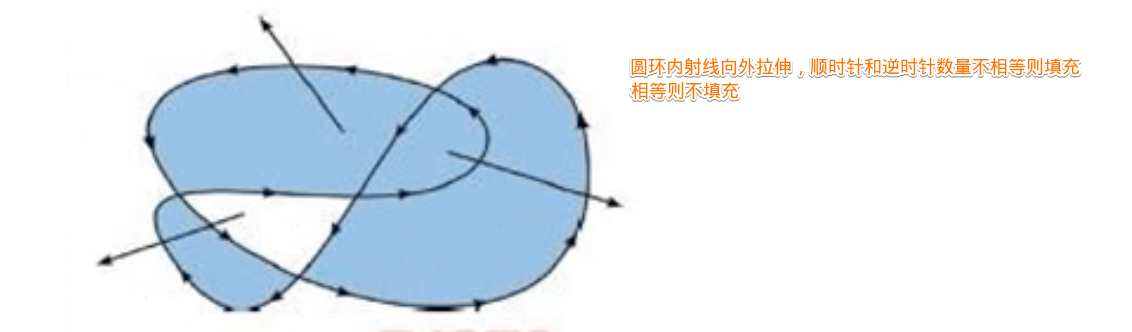
# fill规则
# ctx.canvas
- ctx对象获取本canvas的反向引用
<body>
    <canvas id="canvas" width="500" height="500" style="width:500px; height: 500px;"></canvas>
    <script>
        const ctx = canvas.getContext("2d");

        ctx.fillText("你好呀", 50, 50, 100);

        document.body.append(canvas);
        console.log(ctx.canvas.height); // 500
    </script>
</body>
1
2
3
4
5
6
7
8
9
10
11
2
3
4
5
6
7
8
9
10
11
# clip规则
- 作用:以之前的图形为基准,剪切掉外部的canvas,以后绘图都只会在之前的图形基础上绘制
- 使用:ctx.clip(path?, fillRule?)
- path:路径
- fillRule(判断内部和外部的算法):
evenodd|nonzero
<body>
    <canvas id="canvas" width="500" height="500" style="width:500px; height: 500px;"></canvas>
    <script>
        const canvas = document.querySelector("#canvas");
        const ctx = canvas.getContext("2d");

        ctx.arc(100, 100, 70, Math.PI, 0, false);
        ctx.clip(); // 将上述部分剪裁掉
        ctx.fillRect(0, 0, 100, 100); // 填充形状,被剪裁掉的无法填充
    </script>
</body>
1
2
3
4
5
6
7
8
9
10
11
2
3
4
5
6
7
8
9
10
11
# save/restore
- save通过
栈的形式存储ctx的状态 - restore出栈状态
- 当前的
变换矩阵, 当前的剪切区域?, 当前的虚线列表,strokeStyle,fillStyle,globalAlpha,lineWidth,lineCap,lineJoin,miterLimit,lineDashOffset,shadowOffsetX,shadowOffsetY,shadowBlur,shadowColor,globalCompositeOperation,font,textAlign,textBaseline,direction,imageSmoothingEnabled.
<canvas id="canvas" width="200" height="200" style="width:200px; height: 200px;"></canvas>
<script>
    const canvas = document.querySelector("#canvas");
    const ctx = canvas.getContext("2d");

    ctx.fillRect(10, 10, 20, 20);
    ctx.save();

    ctx.fillStyle = "#999999";
    ctx.fillRect(40, 10, 20, 20);
    ctx.save();

    ctx.fillStyle = "red";
    ctx.fillRect(70, 10, 20, 20);

    ctx.restore();
    ctx.fillRect(100, 10, 20, 20);

    ctx.restore();
    ctx.fillRect(130, 10, 20, 20);
</script>
1
2
3
4
5
6
7
8
9
10
11
12
13
14
15
16
17
18
19
20
21
2
3
4
5
6
7
8
9
10
11
12
13
14
15
16
17
18
19
20
21
<canvas id="canvas" width="200" height="200" style="width:200px; height: 200px;"></canvas>
<script>
    const canvas = document.querySelector("#canvas");
    const ctx = canvas.getContext("2d");

    ctx.save()
    ctx.arc(100, 100, 50, 0, 2 * Math.PI)
    ctx.clip();

    ctx.fillStyle = "red";
    ctx.fillRect(0, 0, 120, 200);

    ctx.restore();
    ctx.fillRect(125, 0, 120, 200);
</script>
1
2
3
4
5
6
7
8
9
10
11
12
13
14
15
2
3
4
5
6
7
8
9
10
11
12
13
14
15
# 文字
| 变量 | 作用 | 调用 |
|---|---|---|
| fillText | 填充文字, 超出maxWidth会被压缩 | fillText(text, x, y, maxWidth?) |
| strokeText | 描边空心文字 | strokeText(text, x, y , maxWidth?) |
| measureText | 检测文字的信息 | ctx.measureText("你好呀").width |
<canvas id="canvas" width="300" height="200" style="width:300px; height: 200px;"></canvas>
<script>
    const canvas = document.querySelector("#canvas");
    const ctx = canvas.getContext("2d");
    const dpr = window.devicePixelRatio;
    canvas.style.width = canvas.width;
    canvas.style.height = canvas.height;
    canvas.width = canvas.width * dpr;
    canvas.height = canvas.height * dpr;
    ctx.scale(dpr, dpr);

    ctx.font = "30px serif";
    ctx.strokeText("你好呀,大佬!", 30, 30, 300);
</script>
1
2
3
4
5
6
7
8
9
10
11
12
13
14
2
3
4
5
6
7
8
9
10
11
12
13
14
# font
- 设置字体
大小和类型 - 值:与css Font (opens new window)可配置项相同
| 值 | 必填 | 事项 | 例 |
|---|---|---|---|
| font-size | 必填 | 20px | |
| font-family | 必填 | 必须最后指定 | 通用字体:serif/sans-serif/monospace/cursive/fantasy/system-ui/math/emoji/fangsong |
| font-style | 非 | 必须在 font-size 之前 | normal / italic / oblique 10deg |
| font-variant | 非 | 必须在 font-size 之前 | normal / none |
| font-weight | 非 | 必须在 font-size 之前,1~1000 | normal / bold / 700 |
| line-height | 非 | 必须在 font-size 之后,数字 / 长度 / 百分比 / normal | normal / 1.5 / 30px / 150% |
<body>
    <canvas id="canvas" width="500" height="500" style="width:500px; height: 500px;"></canvas>
    <script>
        const canvas = document.getElementById("canvas");
        const ctx = canvas.getContext("2d");

        ctx.font = "oblique 30deg 20px serif";
        ctx.fillText("你好呀", 30, 30);

        document.body.append(canvas);
    </script>
</body>
1
2
3
4
5
6
7
8
9
10
11
12
2
3
4
5
6
7
8
9
10
11
12
# direction
- 设置
文字左右方向 - 值:
ltr|rtl|inherit
<body>
    <canvas id="canvas" width="500" height="500" style="width:500px; height: 500px;"></canvas>
    <script>
        const ctx = canvas.getContext("2d");

        //  默认从左往右
        ctx.font = '48px serif';
        ctx.fillText('Hi, Toney!', 250, 40);

        // 修改从右往左
        ctx.direction = 'rtl';
        ctx.fillText('Hi, Toney!', 250, 40);

        document.body.append(canvas);
    </script>
</body>
1
2
3
4
5
6
7
8
9
10
11
12
13
14
15
16
2
3
4
5
6
7
8
9
10
11
12
13
14
15
16
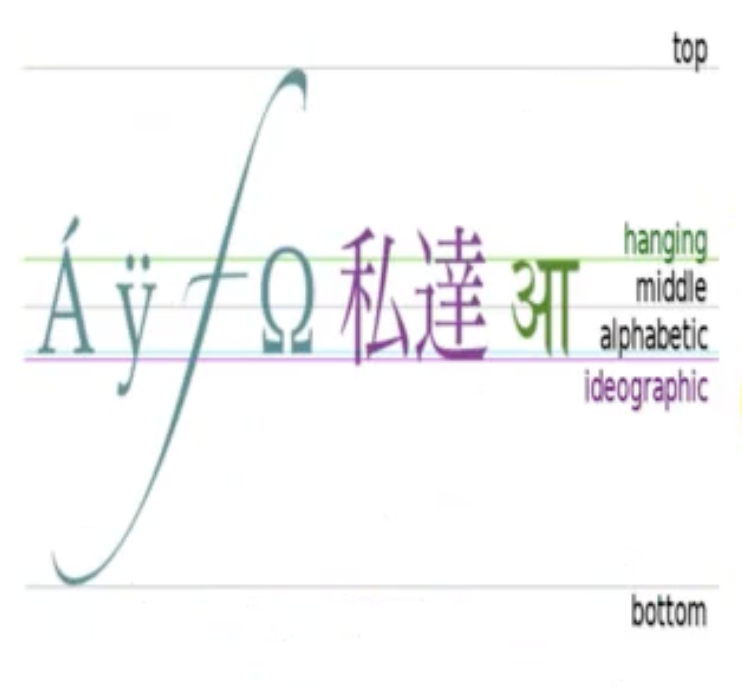
# textBaseLine
- 文字对齐方式
ctx.textBaseLine = 'center';
1
<body>
    <canvas id="canvas" width="500" height="500" style="width:500px; height: 500px;"></canvas>
    <script>
        const canvas = document.querySelector("#canvas");
        const ctx = canvas.getContext("2d");
        const dpr = window.devicePixelRatio;
        canvas.style.width = canvas.width;
        canvas.style.height = canvas.height;
        canvas.width = canvas.width * dpr;
        canvas.height = canvas.height * dpr;
        ctx.scale(dpr, dpr);

        ctx.moveTo(10, 25);
        ctx.lineTo(100, 25);
        ctx.stroke();
        ctx.moveTo(10, 55);
        ctx.lineTo(100, 55);
        ctx.stroke();
        ctx.moveTo(10, 40);
        ctx.lineTo(100, 40);
        ctx.stroke();
        ctx.font = "30px emoji";
        ctx.textBaseline = "center";

        ctx.fillText("你好呀", 100, 40);
    </script>
</body>
1
2
3
4
5
6
7
8
9
10
11
12
13
14
15
16
17
18
19
20
21
22
23
24
25
26
27
2
3
4
5
6
7
8
9
10
11
12
13
14
15
16
17
18
19
20
21
22
23
24
25
26
27
# textAlign
textAlign
<body>
    <canvas id="canvas" width="500" height="500" style="width:500px; height: 500px;"></canvas>
    <script>
        const canvas = document.querySelector("#canvas");
        const ctx = canvas.getContext("2d");
        const dpr = window.devicePixelRatio;
        canvas.style.width = canvas.width;
        canvas.style.height = canvas.height;
        canvas.width = canvas.width * dpr;
        canvas.height = canvas.height * dpr;
        ctx.scale(dpr, dpr);

        ctx.moveTo(100, 0);
        ctx.lineTo(100, 100);
        ctx.stroke();
        ctx.font = "30px emoji";
        ctx.textAlign = "center";
        ctx.fillText("你好呀", 100, 30);
    </script>
</body>
1
2
3
4
5
6
7
8
9
10
11
12
13
14
15
16
17
18
19
20
2
3
4
5
6
7
8
9
10
11
12
13
14
15
16
17
18
19
20
# 线
常用属性
| 变量 | 作用 | 调用 |
|---|---|---|
| moveTo | 移动到XX | moveTo(x, y) |
| lineTo | 连接到XX,(并没有绘制) | lineTo(x, y) |
| getLineDash | 获取当前线段(虚线)样式 | fillText(text, x, y, maxWidth?) |
| setLineDash | 描粗体文字 | setLineDash([4, 4, 10, 10]) |
# lineCap
- 线段末端的属性
| 值 | 效果 |
|---|---|
| butt | 线段末端以方形结束 |
| round | 线段末端以圆形结束 |
| square | 线段末端以方形结束,增加了一个宽度和线段相同,高度是线段厚度一半的矩形区域 |
lineCap
<canvas id="canvas100" width="500" height="500" style="width:500px; height: 500px;"></canvas>
<style>
    canvas {
        background-color: rgb(180, 236, 147);
    }
</style>
<script>
    const canvas = document.getElementById("canvas100");
    const ctx = canvas.getContext("2d");

    ctx.beginPath();
    ctx.moveTo(10, 10);
    ctx.lineTo(100, 100);
    ctx.lineWidth = 15;
    ctx.lineCap = "round";

    ctx.stroke();
</script>
1
2
3
4
5
6
7
8
9
10
11
12
13
14
15
16
17
18
2
3
4
5
6
7
8
9
10
11
12
13
14
15
16
17
18
# lineDashOffset
- 虚线偏移量
lineDashOffset
<body>
    <canvas id="dashCanvas" width="500" height="500" style="width:500px; height: 500px;"></canvas>
    <script>
        const canvas = document.querySelector("#dashCanvas");
        const ctx = canvas.getContext("2d");

        ctx.setLineDash([4, 16]);
        ctx.lineDashOffset = 2;

        ctx.beginPath();
        ctx.moveTo(0, 50);
        ctx.lineTo(400, 50);
        ctx.stroke();

        ctx.setLineDash([0, 0]);
        ctx.beginPath();
        ctx.moveTo(10, 10);
        ctx.lineTo(100, 100);
        ctx.lineWidth = 15;
        ctx.lineCap = "round";

        ctx.stroke();
    </script>
</body>
1
2
3
4
5
6
7
8
9
10
11
12
13
14
15
16
17
18
19
20
21
22
23
24
2
3
4
5
6
7
8
9
10
11
12
13
14
15
16
17
18
19
20
21
22
23
24
- 蚂蚁线
timer
<body>
    <canvas id="dashCanvas" width="500" height="500" style="width:500px; height: 500px;"></canvas>
    <script>
        const canvas = document.querySelector("#dashCanvas");
        const ctx = canvas.getContext("2d");

        ctx.setLineDash([5, 10]);
        let offset = 0;
        const stashLine = (x, y) => {
            ctx.clearRect(0, 0, canvas.width, canvas.height);
            offset++;
            ctx.lineDashOffset = offset;
            ctx.beginPath();
            ctx.moveTo(x, y);
            ctx.lineTo(x + 100, y);
            ctx.lineTo(x + 100, y + 100);
            ctx.lineTo(x, y + 100);
            ctx.lineTo(x, y);
            ctx.stroke();
            setTimeout(() => stashLine(x, y), 10);
        }
        stashLine(10, 10);
    </script>
</body>
1
2
3
4
5
6
7
8
9
10
11
12
13
14
15
16
17
18
19
20
21
22
23
24
2
3
4
5
6
7
8
9
10
11
12
13
14
15
16
17
18
19
20
21
22
23
24
# lineJoin
- 同一条线转弯位置的连接方式
- 可选值:
bevel,round,miter
lineJoin
<body>
    <canvas id="dashCanvas" width="500" height="500" style="width:500px; height: 500px;"></canvas>
    <script>
        const canvas = document.querySelector("#dashCanvas");
        const ctx = canvas.getContext("2d");

        ctx.lineWidth = 20;
        ctx.beginPath();
        ctx.moveTo(10, 10);
        ctx.lineTo(50, 50);

        ctx.lineJoin = "bevel";

        ctx.lineTo(100, 10);
        ctx.stroke();
    </script>
</body>
1
2
3
4
5
6
7
8
9
10
11
12
13
14
15
16
17
2
3
4
5
6
7
8
9
10
11
12
13
14
15
16
17
# lineWidth
- 线宽
ctx.lineWidth = 7;
1
# bezierCurveTo
- 重要:贝塞尔曲线
- ctx.bezierCurveTo(cp1x, cp1y, cp2x, cp2y, x, y)
- 参照点两个,一个结束点
<body style="overflow:hidden;">
    <canvas id="canvas" width="500" height="500" style="width:500px; height: 500px;"></canvas>
    <script>
        const canvas = document.querySelector("#canvas");
        const ctx = canvas.getContext("2d");

        ctx.beginPath();
        ctx.moveTo(100, 100);
        ctx.bezierCurveTo(100, 0, 10, 30, 10, 90);
        ctx.stroke();

        ctx.fillRect(100, 0, 2, 2);
        ctx.fillRect(10, 30, 2, 2);
    </script>
</body>
1
2
3
4
5
6
7
8
9
10
11
12
13
14
15
2
3
4
5
6
7
8
9
10
11
12
13
14
15
# quadraticCurveTo
- 二次贝塞尔曲线
- quadraticCurveTo(cpx, cpy, x, y)
- 参照点坐标,终点坐标
<canvas id="canvas" width="200" height="200" style="width:200px; height: 200px;"></canvas>
<script>
    const canvas = document.querySelector("#canvas");
    const ctx = canvas.getContext("2d");
    ctx.moveTo(0, 0);
    ctx.quadraticCurveTo(50, 100, 100, 0);
    ctx.stroke();
    ctx.fillRect(50, 100, 2, 2)
</script>
1
2
3
4
5
6
7
8
9
2
3
4
5
6
7
8
9
# 形状
| 变量 | 作用 | 调用 |
|---|---|---|
| rect | I 创建矩形路径 | rect(x, y, width, height) |
| fillRect | 填充一个方块 | fillRect(x, y, width, height) |
| strokeRect | 描绘一个方块 | strokeRect(x, y, width, height) |
# strokeStyle/fillStyle
- strokeStyle:画笔(
边框/线条)的颜色、样式 - fillStyle/描述即将渲染的图形(
内部)的颜色和样式 - 值:
color|ctx.createLinearGradient对象 |ctx.createPattern对象
<canvas id="c1" width="500" height="500" style="width:500px; height: 500px;"></canvas>
<script>
    const canvas = document.querySelector("#c1");
    const ctx = canvas.getContext("2d");

    ctx.fillStyle = "#333";
    ctx.fillRect(10, 5, 30, 30);

    ctx.fillStyle = "#879900";
    ctx.fillRect(10, 40, 30, 30);

    ctx.strokeStyle = "red";
    ctx.strokeRect(10, 40, 31, 31);
</script>
1
2
3
4
5
6
7
8
9
10
11
12
13
14
2
3
4
5
6
7
8
9
10
11
12
13
14
# filter
- 模糊、灰度等过滤效果
- 值:
url(<url>)|blur(<length>)|brightness(<percentage>)|contrast(<percentage>)|drop-shadow(<offset-x>, <offset-y>, <blur-radius>, <spread-radius>, <color>)
# globalAlpha
- 全局的
形状和图片的透明度
<body>
    <canvas id="canvas" width="500" height="500" style="width:500px; height: 500px;"></canvas>
    <script>
        const canvas = document.getElementById("canvas");
        const ctx = canvas.getContext("2d");

        ctx.globalAlpha = "0.3";

        ctx.fillStyle = "red";
        ctx.fillRect(10, 10, 100, 100);

        ctx.fillStyle = "blue";
        ctx.fillRect(60, 60, 100, 100);
    </script>
</body>
1
2
3
4
5
6
7
8
9
10
11
12
13
14
15
2
3
4
5
6
7
8
9
10
11
12
13
14
15
# globalCompositeOperation
- 重叠图形的混合配置
| 值 | 效果 |
|---|---|
| destination-atop | 当前已存在的图形只有和新的图形重叠才可以展现,并且居上 |
| source-atop | 只能在当前已存在的图形上绘制的是可展现的部分 |
| source-over | 后来居上 |
| destination-over | 先来居上 |
| source-in | 透明所有图形,新建图形与当前已存在图形重叠才会展示 |
| source-out | 透明所有图形,新建图形与当前已存在图形不重叠才会展示 |
| destination-in | 已存在图形与新建图形重叠才会展示并居上 |
| destination-out | 已存在图形与新建图形不重叠才会展示并居上 |
| lighter | 高亮重叠部分 |
| copy | 将现有的图形全部删掉,新建图形 |
| xor | 重叠部分全部透明 |
| multiply | 重叠部分重新计算复合颜色 |
globalCompositeOperation
<canvas id="canvas100" width="500" height="500" style="width:500px; height: 500px;"></canvas>
<style>
    canvas {
        background-color: rgb(180, 236, 147);
    }
</style>
<script>
    const canvas = document.getElementById("canvas100");
    const ctx = canvas.getContext("2d");

    ctx.fillStyle = "blue";
    ctx.fillRect(10, 10, 100, 100);

    ctx.fillStyle = "blue";
    ctx.fillRect(120, 10, 100, 100);

    ctx.globalCompositeOperation = "destination-atop";

    ctx.fillStyle = "red";
    ctx.fillRect(50, 90, 100, 100);
</script>
1
2
3
4
5
6
7
8
9
10
11
12
13
14
15
16
17
18
19
20
21
2
3
4
5
6
7
8
9
10
11
12
13
14
15
16
17
18
19
20
21
# shadow
| 属性 | 作用 | 值 | 例 |
|---|---|---|---|
| shadowBlur | 阴影范围 | 数字 | 10 |
| shadowColor | 阴影颜色 | String | "#333333" |
| shadowOffsetX | 阴影x轴偏移量 | Number | 10 |
| shadowOffsetY | 阴影Y轴偏移量 | Number | 10 |
<body>
    <canvas id="dashCanvas" width="500" height="500" style="width:500px; height: 500px;"></canvas>
    <script>
        const canvas = document.querySelector("#dashCanvas");
        const ctx = canvas.getContext("2d");

        ctx.shadowColor = "red";
        ctx.shadowBlur = 30;
        ctx.fillStyle = "#333"
        ctx.fillRect(50, 30, 200, 100)
    </script>
</body>
1
2
3
4
5
6
7
8
9
10
11
12
2
3
4
5
6
7
8
9
10
11
12
# 圆
# arc
- 绘制圆弧
形状 - ctx.arc(x, y,
radius,startAngle,endAngle,anticlockwise); anticlockwise: 逆时针,默认为false
<body>
    <canvas id="canvas" width="500" height="500" style="width:500px; height: 500px;"></canvas>
    <script>
        const canvas = document.querySelector("#canvas");
        const ctx = canvas.getContext("2d");
        const dpr = window.devicePixelRatio;
        canvas.style.width = canvas.width;
        canvas.style.height = canvas.height;
        canvas.width = canvas.width * dpr;
        canvas.height = canvas.height * dpr;
        ctx.scale(dpr, dpr);

        ctx.arc(100, 100, 50, Math.PI, 0, false);
        ctx.stroke();
    </script>
</body>
1
2
3
4
5
6
7
8
9
10
11
12
13
14
15
16
2
3
4
5
6
7
8
9
10
11
12
13
14
15
16
# arcTo
- ctx.arcTo(x1, y1, x2, y2, radius);
- 需要先到一个点,然后根据arcTo传的两个点做出来一个角,然后从初始点到这个角的切线
<body>
    <canvas id="canvas" width="500" height="500" style="width:500px; height: 500px;"></canvas>
    <script>
        const canvas = document.querySelector("#canvas");
        const ctx = canvas.getContext("2d");

        ctx.beginPath();
        ctx.moveTo(100, 100);
        ctx.arcTo(100, 0, 0, 0, 100); // 直角切线,半径100
        ctx.stroke();

        // 画出直角
        ctx.beginPath();
        ctx.moveTo(0, 0);
        ctx.lineTo(100, 0);
        ctx.lineTo(100, 100);
        ctx.setLineDash([4, 4]);
        ctx.stroke();
    </script>
</body>
1
2
3
4
5
6
7
8
9
10
11
12
13
14
15
16
17
18
19
20
2
3
4
5
6
7
8
9
10
11
12
13
14
15
16
17
18
19
20
# ellipse
- 椭圆:ellipse(x, y, radiusX, radiusY, rotation, startAngle, endAngle, anticlockwise)
- x, y:圆心
- rotation: 旋转角度,顺时针旋转
- startAngle, endAngle:开始结束角度,顺时针计算
- anticlockwise:是否逆时针,默认false
定完 startAngle, endAngle就已经确定起始和结束位置了
anticlockwise
<canvas id="canvas" width="1000" height="1000" style="width:1000px; height: 1000px;"></canvas>
<script>
    const canvas = document.querySelector("#canvas");
    const ctx = canvas.getContext("2d");
    ctx.ellipse(100, 100, 40, 20, 45/180 * Math.PI, 0, 1 / 3 * Math.PI, true);
    ctx.stroke();
</script>
1
2
3
4
5
6
7
2
3
4
5
6
7
# 颜色
# addColorStop
- 渐变颜色的填充器
- 调用:
gradient.addColorStop(0.3, "blue")
# createConicGradient
- 作用:围绕某个点做圆状渐变
- 调用:ctx.createConicGradient(
startAngle,x,y) - 返回:圆状渐变
制作器 - 制作渐变:gradient.addColorStop(0~1, color)
- 通过
fillStyle将渐变制作器加上。
<body>
    <canvas id="canvas" width="500" height="500" style="width:500px; height: 500px;"></canvas>

    <script>
        const canvas = document.querySelector("#canvas");
        const ctx = canvas.getContext("2d");

        const gradient = ctx.createConicGradient(0, 120, 120);
        gradient.addColorStop(0, "red");
        gradient.addColorStop(0.5, "blue");
        gradient.addColorStop(1, "red");
        ctx.fillStyle = gradient;
        ctx.arc(120, 120, 100, 0, 2 * Math.PI);
        ctx.fill();
    </script>
</body>
1
2
3
4
5
6
7
8
9
10
11
12
13
14
15
16
2
3
4
5
6
7
8
9
10
11
12
13
14
15
16
# createLinearGradient
<canvas id="canvas" width="200" height="200" style="width:200px; height: 200px;"></canvas>

<script>
    const canvas = document.querySelector("#canvas");
    const ctx = canvas.getContext("2d");

    const gradient = ctx.createLinearGradient(10, 0, 100, 100);
    gradient.addColorStop(0, "red");
    gradient.addColorStop(0.3, "blue");
    gradient.addColorStop(1, "pink");
    ctx.fillStyle = gradient;
    ctx.fillRect(10, 10, 100, 100);
</script>
1
2
3
4
5
6
7
8
9
10
11
12
13
2
3
4
5
6
7
8
9
10
11
12
13
# createRadialGradient
<body>
    <canvas id="canvas" width="200" height="200" style="width:200px; height: 200px;"></canvas>

    <script>
        const canvas = document.querySelector("#canvas");
        const ctx = canvas.getContext("2d");


        let stopR = new Proxy({ val: 80 }, {
            set(t, k, v) {
                ctx.clearRect(0, 0, 200, 200);
                const gradient = ctx.createRadialGradient(100, 100, 100, 100, 100, v);
                gradient.addColorStop(0, "#fff");
                gradient.addColorStop(1, "#a2d5ec");
                ctx.fillStyle = gradient;
                ctx.arc(100, 100, 100, 0, 2 * Math.PI);
                ctx.fill();
                Reflect.set(t, k, v);
            }
        })
        const animate = () => {
            stopR.val = stopR.val > 80 ? 0 : stopR.val + 3;
            setTimeout(animate, 100)
        }
        animate();
    </script>
</body>
1
2
3
4
5
6
7
8
9
10
11
12
13
14
15
16
17
18
19
20
21
22
23
24
25
26
27
2
3
4
5
6
7
8
9
10
11
12
13
14
15
16
17
18
19
20
21
22
23
24
25
26
27
# 图片
# 增删改
| api | 调用 | 说明 |
|---|---|---|
| drawImage | img.onload = () => ctx.drawImage(img, x, y, width, height) | 需要已加载完毕的图片才能绘制 |
| createImageData | createImageData(width, height)|imagedata | 都是指定为透明黑,只不过使用imagedata会创造相同的像素的透明黑初始图片 |
| getImageData | getImageData(left, top, width, height) | 获取canvas指定区域的像素作为图片对象 |
| putImageData | putImageData(myImageData, dx, dy) | 将指定Image对象以像素的形式写入 |
点击图片反转颜色
<body>
    <canvas id="canvas" width="200" height="200" style="width:200px; height: 200px;"></canvas>

    <script>
        const canvas = document.querySelector("#canvas");
        const ctx = canvas.getContext("2d");
        canvas.width = 1000;
        canvas.height = 1000;
        const img = new Image();
        img.src = "/assets/img/portrait.jpg";
        img.onload = () => ctx.drawImage(img, 0, 0);
        const reverse = () => {
            const imgData = ctx.getImageData(0, 0, 1000, 1000);
            const data = imgData.data;
            for (let i = 0; i < data.length; i += 4) {
                data[i] = 255 - data[i];
                data[i + 1] = 255 - data[i + 1];
                data[i + 2] = 255 - data[i + 2];
            }
            ctx.putImageData(imgData, 0, 0)
        }
        canvas.addEventListener("click", reverse)
    </script>
</body>
1
2
3
4
5
6
7
8
9
10
11
12
13
14
15
16
17
18
19
20
21
22
23
24
2
3
4
5
6
7
8
9
10
11
12
13
14
15
16
17
18
19
20
21
22
23
24
# drawImage配合input
const ctx = getCtx(canvas);
// input获取图片文件,传入canvas展示
/* <input type="file" accept="image/*" class="file" /> */
const getImgData = (e) => {
    const imgFile = e.target.files[0];
    console.log(imgFile)
    let reader = new FileReader();
    reader.onload = (e) => {
        const img = new Image();
        img.src = e.target.result;
        console.log(img)
        img.onload = () => {
            imgWidth = img.width;
            imgHeight = img.height;
            ctx.drawImage(img, 0, 0, imgWidth, imgHeight);
        }

    }
    reader.readAsDataURL(imgFile);
}
file.addEventListener("change", getImgData);

// 导出图片
// let imageData = ctx.getImageData(0, 0, this.imageWidth, this.imageHeight);
// this.canvasSrc = this.canvas.toDataURL("image/png");
1
2
3
4
5
6
7
8
9
10
11
12
13
14
15
16
17
18
19
20
21
22
23
24
25
2
3
4
5
6
7
8
9
10
11
12
13
14
15
16
17
18
19
20
21
22
23
24
25
# getImageData
- 作用:获取canvas画布的像素对象
- 调用:getImageData(
left,top,width,height) - 图片取色器 (opens new window)
<body>
  <canvas width="300px" height="300px" id="canvas"></canvas>
  <img src="/assets/img/portrait.jpg" alt="" id="img" style="width: 0;"/>
  <h4>移动取色,点击固定色:<span id="span"></span></h4>

    <script>
      const canvas = document.querySelector("canvas");
      const ctx = canvas.getContext("2d");
      const setColor = (e) => {
          const {x, y} = e;
          const {data: rgba} = ctx.getImageData(x, y, 1, 1);
          if (rgba) {
            const color = `rgba(${rgba[0]}, ${rgba[1]}, ${rgba[2]}, ${rgba[3]})`
            canvas.style.backgroundColor = color;
            span.innerText = color;
          }
      };
      canvas.addEventListener("mousemove", setColor);
      canvas.addEventListener("click", () => canvas.removeEventListener("mousemove", setColor));
      img.onload = () => ctx.drawImage(img, 50, 50, 200, 200);
    </script>
</body>
1
2
3
4
5
6
7
8
9
10
11
12
13
14
15
16
17
18
19
20
21
22
2
3
4
5
6
7
8
9
10
11
12
13
14
15
16
17
18
19
20
21
22
# toDataURL
- 导出canvas为图像,可以用来下载
- 调用:canvas.toDataURL("image/png", 1)
- 第二个参数为图片质量,默认
0.92
<body>
    <canvas id="canvas" width="300" height="200" style="width:300px; height: 200px;border: 1px solid #333"></canvas>
    <button id="btn">下载</button>
    <script>
        const canvas = document.querySelector("#canvas");
        const ctx = canvas.getContext("2d");
        const dpr = window.devicePixelRatio;
        canvas.width *= dpr;
        canvas.height *= dpr;
        ctx.scale(dpr, dpr);

        ctx.lineWidth = 3;
        const rect = canvas.getBoundingClientRect();
        let drawing = new Proxy({ val: false }, {
            set(target, k, v) {
                if (v === true) ctx.beginPath();
                Reflect.set(target, k, v);
            }
        });
        canvas.addEventListener("mousedown", e => drawing.val = true);
        canvas.addEventListener("touchstart", e => drawing.val = true);
        canvas.addEventListener("mousemove", e => {
            if (!drawing.val) return;
            ctx.lineTo(e.x - rect.x, e.y - rect.y);
            ctx.stroke();
        })
        canvas.addEventListener("touchmove", e => {
            e.preventDefault();
            if (!drawing.val) return;
            ctx.lineTo(e.targetTouches[0].clientX - rect.x, e.targetTouches[0].clientY - rect.y);
            ctx.stroke();
        })
        canvas.addEventListener("mouseup", e => drawing.val = false);
        canvas.addEventListener("touchend", e => drawing.val = false);

        btn.addEventListener("click", () => {
            const url = canvas.toDataURL("image/png");
            const a = document.createElement("a");
            a.href = url;
            a.download = "img.png"; // 下载文件名
            document.body.append(a);
            a.click();
            a.remove();
            ctx.clearRect(0, 0, 300, 200);
        })
    </script>
</body>
1
2
3
4
5
6
7
8
9
10
11
12
13
14
15
16
17
18
19
20
21
22
23
24
25
26
27
28
29
30
31
32
33
34
35
36
37
38
39
40
41
42
43
44
45
46
47
2
3
4
5
6
7
8
9
10
11
12
13
14
15
16
17
18
19
20
21
22
23
24
25
26
27
28
29
30
31
32
33
34
35
36
37
38
39
40
41
42
43
44
45
46
47
# 变换
| 变量 | 作用 | 调用 |
|---|---|---|
| getTransform | 获取当前被应用到上下文的转换矩阵 | getTransform() |
| setTransform | 重新设置变换矩阵并调用变换的方法 | setTransform(a, b, c, d, e, f) |
| resetTransform | 重新设置当前变形 | setTransform(a, b, c, d, e, f) |
| transform | 多次叠加当前变换 | transform(a, b, c, d, e, f) |
| translate | canvas平移变换 | translate(x, y) |
| rotate | 旋转 | rotate(angle) |
# rotate
旋转中心是canvas起始点,可以通过 translate() 方法移动 canvas。
<canvas id="canvas" width="200" height="200" style="width:200px; height: 200px;"></canvas>
<script>
    const canvas = document.querySelector("#canvas");
    const ctx = canvas.getContext("2d");

    ctx.rotate(45 / 180 * Math.PI);
    ctx.fillRect(50, 10, 20, 20);
</script>
1
2
3
4
5
6
7
8
2
3
4
5
6
7
8
<body>
    <canvas id="canvas"></canvas>
    <script>
        const canvas = document.querySelector("#canvas");
        canvas.setAttribute("style", "width: 100vw; height: 100vh");
        const { innerWidth, innerHeight, devicePixelRatio: dpr } = window;

        canvas.width = innerWidth * dpr;
        canvas.height = innerHeight * dpr;


        const ctx = canvas.getContext("2d");
        ctx.scale(dpr, dpr);

        const xOffset = 100;
        const yOffset = 75;

        ctx.save();

        // 画布旋转圆心总是 ctx 左上角,所以移动圆心就要移动 ctx
        // 将圆心从左上角移动到指定位置,再把 ctx 拉回来绘画
        ctx.translate(xOffset, yOffset);
        ctx.rotate(15 * Math.PI / 180);
        ctx.translate(-xOffset, -yOffset);
        ctx.fillStyle = "#000000";
        ctx.fillRect(50, 50, 100, 50);

        // 恢复到初始ctx状态
        ctx.restore();

        ctx.fillStyle = "#000000";
        ctx.fillRect(50, 130, 100, 50);
    </script>
</body>
``
1
2
3
4
5
6
7
8
9
10
11
12
13
14
15
16
17
18
19
20
21
22
23
24
25
26
27
28
29
30
31
32
33
34
35
2
3
4
5
6
7
8
9
10
11
12
13
14
15
16
17
18
19
20
21
22
23
24
25
26
27
28
29
30
31
32
33
34
35
# setTransform
- 将整个canvas画板进行变换
// 水平缩放,垂直倾斜,水平倾斜,垂直缩放,水平移动,垂直移动
ctx.setTransform(a, b, c, d, e, f);
1
2
2
# 其他
| 变量 | 作用 | 调用 |
|---|---|---|
| isPointInPath | 检测当前路径中是否包含检测点 | isPointInPath(path?, x, y, fillRule?) |
| isPointInStroke | 检测当前描边线中是否包含检测点 | resetTransform() |