- 最详细的文档请查看权威英文文档 (opens new window)
- 中文文档 (opens new window)
- 猴子都能懂的git教程 (opens new window)
- github中文文档 (opens new window)
- 开源指北 (opens new window)
仓库版本

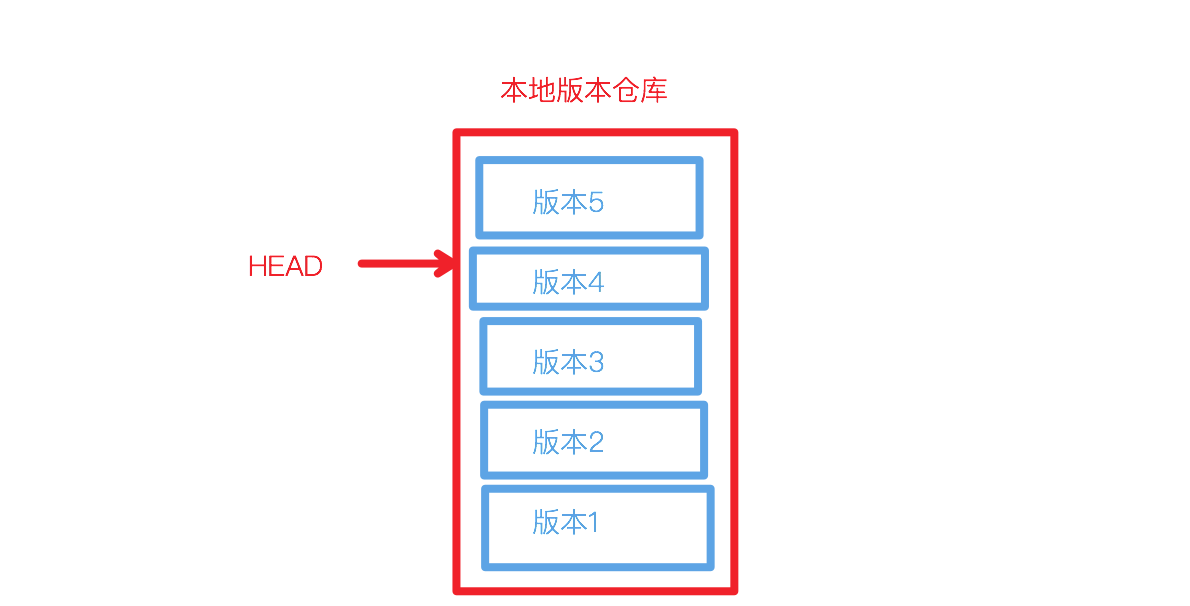
HEAD指针
- 本地仓库有很多版本
- 而要对比暂存区和当前版本的区别时,就需要指定是相对于哪一个版本
- 所以有HEAD指针,指向当前版本

# git init
- 初始化git仓库
git init
1
# git config
配置文件
- 配置文件查找顺序:本地 -> 全局 -> 系统
# 查看本地配置文件
cat .git/config

# 查看全局配置
cat ~/.gitconfig

# 查看系统配置(需要有root权限,基本不用)
cat /etc/.gitconfig
1
2
3
4
5
6
7
8
2
3
4
5
6
7
8
- 配置本地仓库信息
# 本地仓库配置
git config user.name 'coderWdy'
git config user.email 'huangdeyu2020@163.com'

git config --local user.name 'coderHdy'
git config --local user.email '986005715@qq.com'

# 全局仓库配置
git config --global user.name 'huangdeyu'
git config --global user.email 'huangdeyu2020@163.com'

# 查看配置
git config -l
git config --list
git config --global --list
git config --local --list

# 删除配置
git config --unset user.email
git config --unset-all user.email
1
2
3
4
5
6
7
8
9
10
11
12
13
14
15
16
17
18
19
20
2
3
4
5
6
7
8
9
10
11
12
13
14
15
16
17
18
19
20
# ssh-keygen
- 绑定远程仓库需要使用 SSH key
# 用我的邮箱生成 ssh-key (中间可以配置存放路径)
ssh-keygen -t rsa -C huangdeyu2020@163.com
# mac下查看生成的key (自己的路径)
cat ~/.ssh/id_rsa.pub
1
2
3
4
# 一台电脑配置多个git对应仓库
- 生成每个git对应的邮箱 ssh-key 放置到
不同路径下# ~/.ssh/id_rsa ssh-keygen -t rsa -C huangdeyu2020@163.com # ~/.ssh/id_rsa_work ssh-keygen -t rsa -C 986005715@qq.com1
2
3
4
5 - 配置多config
# 编辑 config 对应配置文件,映射每个主机对应的配置和 ss-key 位置
vim ~/.ssh/config
1
2Host coderHDY hostname github.com User git IdentityFile ~/.ssh/id_rsa Host coder-HDY hostname github.com User git IdentityFile ~/.ssh/work_id_rsa Host gitee hostname gitee.com User git IdentityFile ~/.ssh/id_rsa1
2
3
4
5
6
7
8
9
10
11
12
13
14 - 拉取仓库时指定host,来对应config,如:
github.com改成coderHDYgit clone git@github.com:coderHDY/myblog.git # 改成这样⬇️ git clone git@coderHDY:coderHDY/myblog.git1
2
3 - 同时设置本仓库的git用户信息
git config --local user.name 'coderHDY'
git config --local user.email '986005715@qq.com'
1
2 - 此仓库使用操作时自动使用host对应配置
# 将密钥添加到缓存中
- 添加到缓存中就不会读取 ~/ssh/config 里面 的配置,发送git命令自动携带缓存密钥
ssh-add --apple-use-keychain ~/.ssh/work_id_rsa

# 删除
ssh-add -d ~/.ssh/work_id_rsa
1
2
3
4
2
3
4
# 22端口连接失败
vim ~/.ssh/config
1
- 改成443端口并且指定ssh连接
Host coderHDY
    Port 443
    Hostname ssh.github.com
    User git
    IdentityFile ~/.ssh/id_rsa
1
2
3
4
5
# git clone
- 克隆远程仓库到本地
- 拿到远程仓库的ssh地址
- 克隆到本地
git clone git@github.com:coderHDY/myblog.git

# 自定义文件名字
git clone git@github.com:coderHDY/myblog.git blog
1
2
3
4
2
3
4
# git remote
- 设置和查看和本地绑定的远程仓库
- 名字是关联的时候取的,可以随意更改,与远程无关,只是本地关于远程仓库的叫法
# 查看远程仓库
git remote show
git remote -v

# 设置上游仓库
git remote add origin git@github.com:coderHDY/myblog.git

# 删除上游(远程)仓库绑定
git remote rm origin

# 修改远程仓库在本地的名字
git remote rename origin main
1
2
3
4
5
6
7
8
9
10
11
12
2
3
4
5
6
7
8
9
10
11
12
# git add
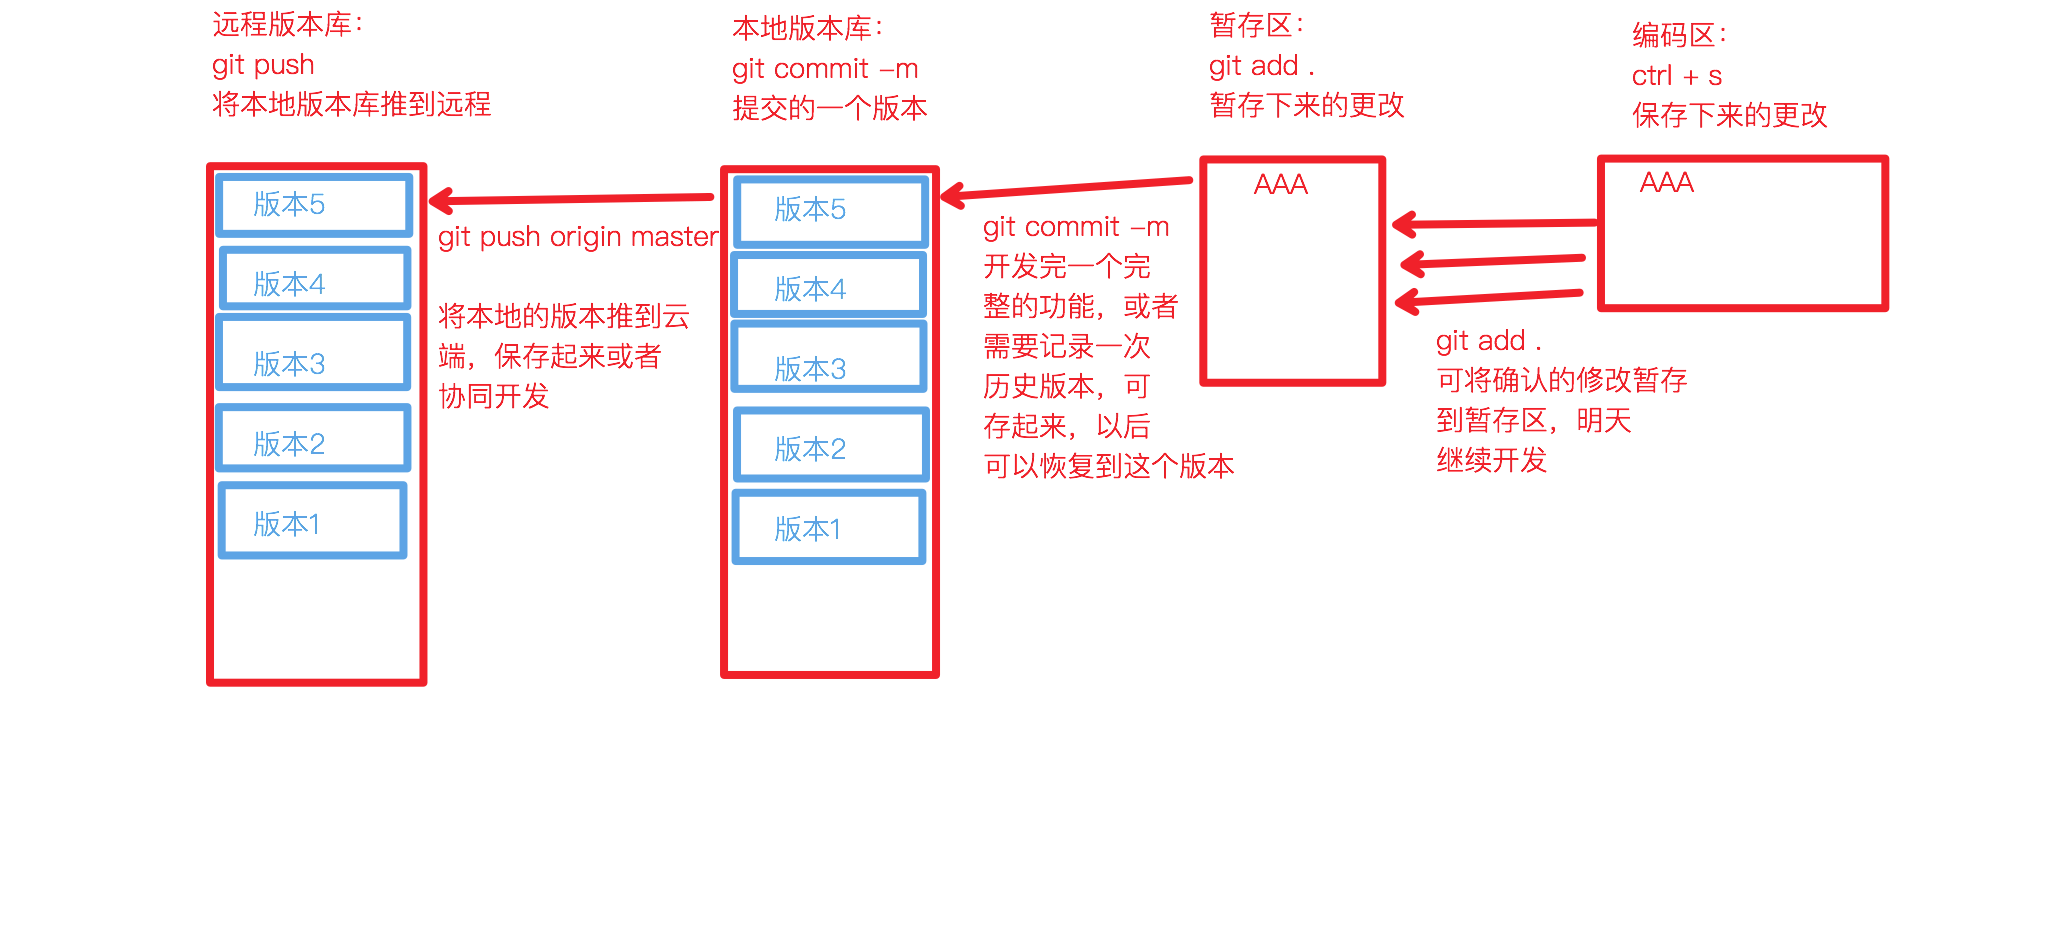
- 将本地更改添加到本地缓存
本地缓存
git 通过二进制算法记录了这个文件,放进缓存目录,只是代表将此文件暂存的意思,一个或多个缓存 commit 生成一个版本
git add index.html
# 缓存全部本地更改
git add .
1
2
3
2
3
# git commit
- 将本地缓存文件提交,生成一个版本
版本
- 在本地仓库有了版本的文件将永远不会丢失,除非电脑损坏或者删除隐藏的 .git 文件
- git通过二进制的算法将这次的更改记录起来,内存消耗很少,形成了一个可回溯的
版本
git commit -m 'some change'
1
- 将改动合并到上一个版本中
git commit --amend

# 如果已经推送到远程仓库
git push -f
1
2
3
4
# git status
- 查看当前的状态
- 有修改未暂存
- 有暂存未提交
- 有提交未放到远程仓库
git status
1
# git log
- 打印本地的所有版本信息
- 可以看到当前的HEAD指针指向的哪个版本
HEAD指针
本地仓库多次commit后会生成多个版本库,HEAD指针指向的是当前正在用的的版本库
# 详细信息
git log
# 精简版
git reflog
1
2
3
4
2
3
4
# git show
- 显示版本 diff 信息
# 显示最近一次commit的详细信息
git show
# 显示当前版本与指定版本的diff
git show 4022c4c
# 展示最近十次的commit信息
git show-branch --more=10
1
2
3
4
5
6
2
3
4
5
6
# git diff
- 比较两个版本之间的差异
较新的版本要放到后面
# 与当前HEAD 版本比较
git diff

# 与上个HEAD版本比较
git diff HEAD^ HEAD
# 与指定版本diff
git diff 4022c4c HEAD
1
2
3
4
5
6
7
2
3
4
5
6
7
# git push
- 当前仓库的HEAD指针指向的版本推到远程仓库
# 精简版
git push
# 完整版
git push origin master:master
# 本地和远程同一分支,省略版
git push origin master

# 本地版本与远程版本有差异,强制推送?
git push --force origin master

# 删除远程分支
git push origin --delete master
1
2
3
4
5
6
7
8
9
10
11
12
2
3
4
5
6
7
8
9
10
11
12
# git rm
- 版本仓库中删除某个文件
# 删除某个文件
# rm 代表删除并暂存这个变更,commit提交版本
git rm docs/skill/linux/README.md
# 删除某个文件夹
git rm -r docs/skill/linux/
1
2
3
4
5
2
3
4
5
# 合并commit
合并commit
- 本地多个commit合并成一个进行提交
- 需求,合并BC版本:ABC -> AD
# 找到需要变基的版本(A)
git reflog

# 变基成A
git rebase -i HashA

# 进入编辑模式
# 第一个pick是最终提交的版本
# 下面的所有pick全部改成squash,合并到最上面的提交版本
git log
# 合并成功
1
2
3
4
5
6
7
8
9
10
11
2
3
4
5
6
7
8
9
10
11
- 合并过程中撤销
git rebase --abort
1
更简单的方法
- 使用git reset --soft版本指向合并前版本(A)
- 再提交一次,即可覆盖所有中途版本
# 找到合并前版本号
git reflog

# HEAD指针移动
git reset --soft hashA

# 再提交一次
git commit -m '合并所有提交'
1
2
3
4
5
6
7
8
2
3
4
5
6
7
8
